Once you have setup your security camera system by connecting the cameras to the DVR or NVR, and you have video displaying from each camera on a monitor, the next step is to setup remote viewing for your security cameras. All of our security camera recorders come with a built-in web server that is always functional when the recorder is powered up, and allows viewing over the local area network (LAN) or over the internet. This security camera remote viewing guide will show you how to connect to your surveillance system using an iOS or Android device.
Prerequisites
Before you can connect to your security camera system over the internet or LAN, here is a checklist of tasks to have completed:

- The NVR or DVR recorder is powered on
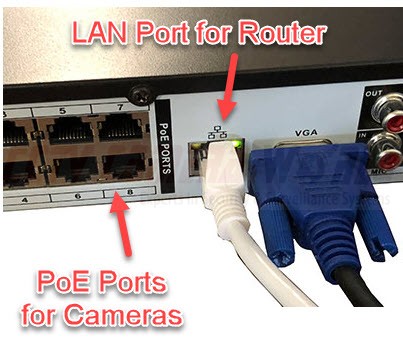
- You have a network cable connected from the main network port of the recorder to your router (see image to the right)
- You see blinking lights on the back of the network port of the NVR
- Your phone or tablet is connected via WiFi to the same network as the NVR
- You have connected the NVR to the internet by assigning an IP address on the NVR that matches the network scheme of your network. If you haven't here's how to connect your security cameras to the internet.
- To view security cameras from the internet, you have to configure port forwarding rules on your router to allow data to pass through its firewall and reach the camera recorder.
Port forwarding is not necessary if you want to view the security camera system from the local network only, or if you would like to use the Peer-to-Peer (P2P) method to connect to your system from the internet. However, since P2P connectivity can be sluggish, we recommend the user setup port forwarding on their router's firewall to allow quick and direct connections to the camera system.
P2P or Port Forwarding? When you use P2P networking such as scanning a QR code in to your mobile app to connect to your DVR, you are relying on a cloud server that's being shared by several customers. While P2P makes things simpler there are potential privacy and security risks. Purchasing a
networking support session for remote support allows our knowledgable technicians to set up port forwarding for you. Port forwarding provides a secure direct connection from your phone to your DVR and is highly recommended.
Proper configuration of your router's port forwarding rules is a necessary step you must take to view your cameras from the outside world. By default, your router or firewall will block the ports that the DVR or NVR uses to communicate. This is not a flaw. It's basic network security.
We have a number of guides on how to configure port forwarding on your own router. We recommend you read Port Forwarding for Your Security DVR/NVR System to understand basic computer networking principles and gain a general idea of port forwarding. You can find router specific port forwarding guides here or find more on portforward.com.
If you can't follow the above mentioned guides, or contact your ISP to configure your router for you, we do offer networking services to configure your router remotely at a very low rate of $50 per half hour. Alternatively, you could contact a local networking professional to configure your home or business router. We provide the necessary information to forward your ports. It's up to you to implement these practices on your networking equipment.
If you've already configured port forwarding rules on your router and you know your internet connection's external IP address or DDNS address, you're ready to configure the phone/table app for use.
Install the app Pegaso or Pegaso Plus
Download and install the phone/tablet application Pegaso or Pegaso Plus. This can be found by searching Pegaso in either the App Store for iOS or Google Play store for Android. You can also click on the pictures below to take you to the App Store or Google Play link.
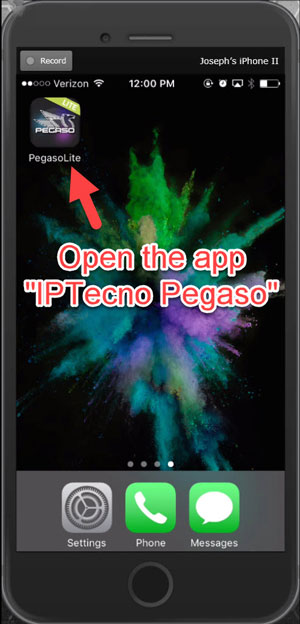
Step 1: Open the App Pegaso
After you've installed the app Pegaso, locate it on your phone and open it to continue adding a device entry for you security camera DVR or NVR.
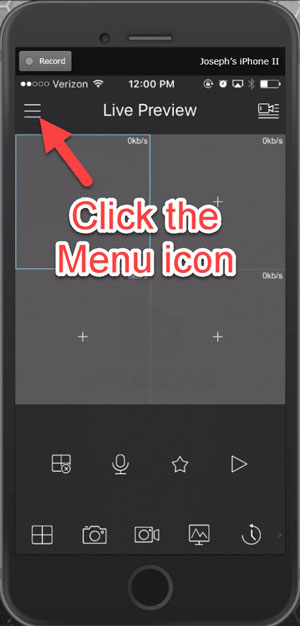
Step 2: Click the Menu icon
In the top-left corner, you'll see a small square icon with three lines. This is the Menu icon. Click this icon and proceed to the next step.
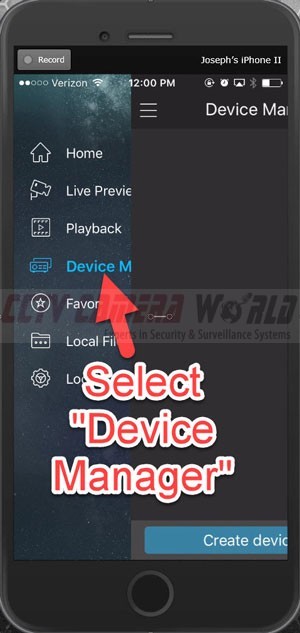
Step 3: Select Device Manager
In the Menu screen, select the Device Manager option.
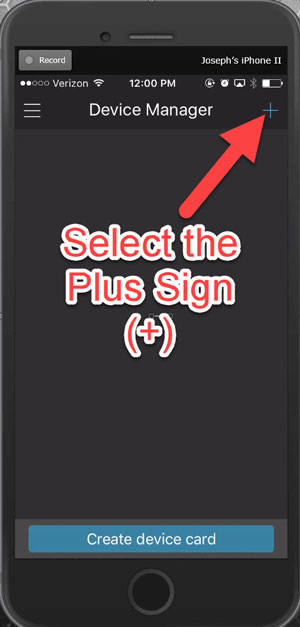
Step 4: Select the Plus Sign
Select the plus sign in the top right corner to add a device.
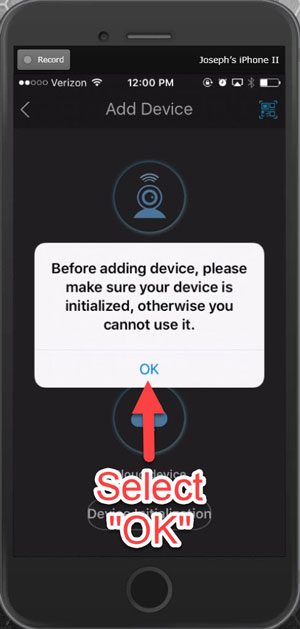
Step 5: Ensure Your Device is Initialized
A prompt window will appear alerting you to ensure your device has been initialized. If you have followed all the steps till now, then you should have your DVR or NVR recorder connected to the network. Simply select OK.
Step 6: Select Wired Device
A new screen will appear asking for the type of device you want to add. Even if you are using this guide to connect one of our wireless security cameras, Select Wired Device and proceed to the next step.

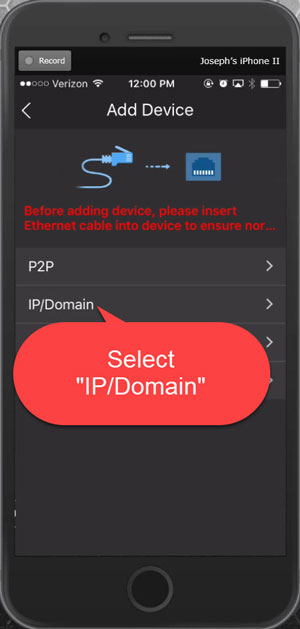
Step 7: Select IP/Domain
Select the IP/Domain option to enter an IP address or Domain Name entry.
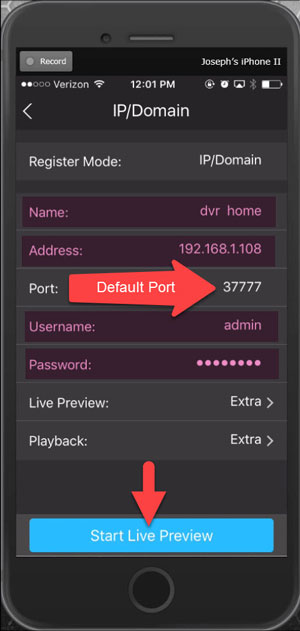
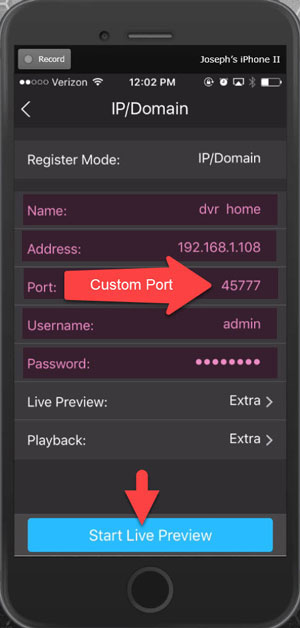
Step 8: Create a Local Network Entry (DVR Home) Using the Default TCP Port
For this step to work, it is important that your phone is connected to your network using WiFi so that you are connected to the same network as the camera system. Fill out the appropriate DVR or NVR credentials that are specific to you. In the image below, we named the device entry "dvr home," as we will be accessing it when connected to the local network at home via WiFi. The DVR's IP address is 192.168.1.108. The default TCP is 37777, and this can remain in place as long as you have not changed your default TCP port. Next, type in the DVR's username and password, and select Start Live Preview to view your system.
Step 9: Create an External Network Entry (DVR Away) Using the Default TCP Port
When away from your local Wi-Fi network, you need to use your external IP address to view your security camera system remotely. This requires creating a second device entry, repeating steps 1 through 6, and filling out the appropriate device credentials but now using the external IP address of the internet connection where the camera system is located. In this case, we're using the external IP address of 141.182.16.80. Select Start Live Preview to view your system remotely.
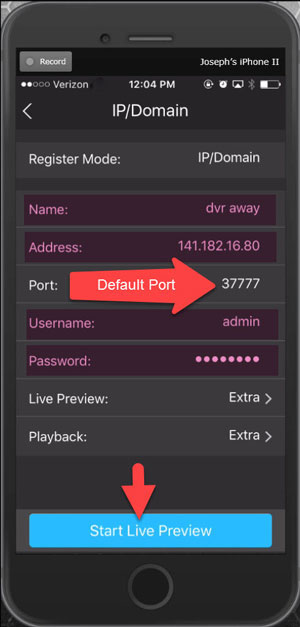
If you kept the default TCP port number (37777) in place, then you are done configuring the device entries in the app. If you are using a custom TCP, continue to steps 9 and 10.
Step 9: Create a Local Network Entry (DVR Home) Using a Custom TCP Port
If you changed the TCP port number in your DVR or NVR, then you need to update the port number displayed in the IP/Domain screen in the app as it will default to 37777. In this case, we changed our TCP port to 45777 in our DVR and then updated the app's IP/Domain screen to display Port: 45777 when creating this entry. Next, click Start Live Preview to view your system.
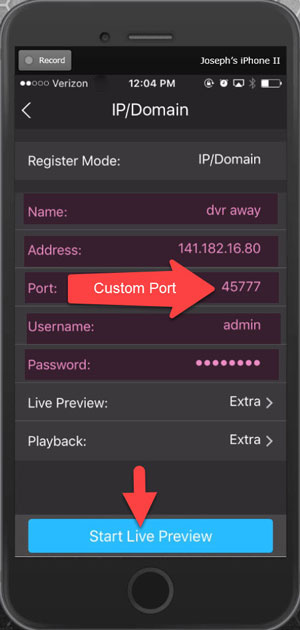
Step 10: Create an External Network Entry (DVR Away) Using a Custom TCP Port
For viewing your system remotely with custom ports you first need to fill out the appropriate device credentials using your external IP address. Next, you need to update the default port (as you did in Step 9) to display the custom port number you're using. In this case, the custom TCP port is 45777, indicated below. Lastly, select Start Live Preview to view your system remotely.
Troubleshooting
By now you should be viewing your security camera system from your mobile device. If you are unable to connect to your system and are receiving an error message, here's a list of settings to double check:
- Confirm you are using the correct username and password for the recorder. All of the new units have a password label located on top of the unit towards the front.
- If you are unable to connect over the LAN, make sure the recorder is connected properly to the same network as the phone and that you have configured an IP address on the recorder to match your network's IP scheme.
- If you are unable to connect over the internet when you disconnect the phone's WiFi, make sure you have configured port forwarding rules on your router by following our port forwarding guide, or having your ISP configure your router


 and GDMSS(Android) 1")